It’s not immediately obvious on Nelify how you can host multiple sites all under the same domain when using multiple Netlify applications. This is probably because Netlify prefers to map a domain to a particular application, but you can work around this by using rewites to map url paths to sub domains.

This is really useful should you have a multi-region site where you want to keep all the ‘sites’ under the same domain - rather than split them across different sub-domains or TLD’s.

So, for example, if you had a site designed for 3 regions: Britain, Ireland & Germany

Site Structure

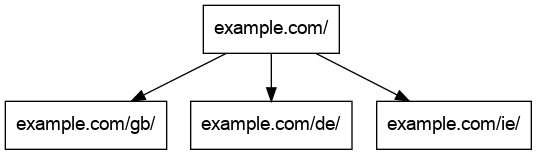
and you wanted the URL structure to be like the following:

https://example.com/gb/
https://example.com/ie/
https://example.com/de/

First you need to great 4 netlify applications, one for each of the site specific apps and an 4th for the master site to redirect to the others. Each of the site specific applications should be mapped to a subdomain. You then end up with a setup like this:

App "Master" - example.com
App "GB" - gb.example.com
App "IE" - ie.example.com
App "DE" - de.example.com

You can then configure the master application to redirect to a site specific app on a specific url path. The netlify.toml on the main site looks like this:

[[redirects]]
  from = "/gb/*"
  to = "https://gb.example.com/:splat"
  status = 200

[[redirects]]
  from = "/de/*"
  to = "https://de.example.com/:splat"
  status = 200

[[redirects]]
  from = "/ie/*"
  to = "https://ie.example.com/:splat"
  status = 200

_Note: If the site specific applications use absolute URL’s you need to remeber to add the path prefix otherwise the url may be resolved by the master app.

Once setup, you can add an additional layer to redirect the traffic automatically based on the calling users IP address by adding further redirects to the master sites netlify.toml:

[[redirects]]
  from = "/*"
  to = "/gb/"
  status = 302
  force = true
  conditions = {Country = ["gb"]}

[[redirects]]
  from = "/*"
  to = "/de/"
  status = 302
  force = true
  conditions = {Country = ["de"]}

[[redirects]]
  from = "/*"
  to = "/ie/"
  status = 302
  force = true
  conditions = {Country = ["ie"]}

Once donem these redirects will push users from example.com/ to example.com/<site path> automatically. It can make testing difficult however, so you can override this behaviour by setting a nf_country cookie with the correct ISO 3166 country code.

A full working example can be found on Github and a sample Netlify app.

Javascript has a surprisingly neat (and built-in) way to format currency values using it’s Internationalization API Intl.

It’s the sort of thing thats often forgotten when ‘internatinalising’ sites as the variation of display for numeric values isn’t widely appreciated. But using the Internationalization API it’s really simple to display numbers in the preferred format of your users.

To format a currency output, use Intl.NumberFormat:

const currencyFormatter = new Intl.NumberFormat('de', {
  style: 'currency',
  currency: 'EUR',
})

currencyFormatter.format(100) 
// -> "100,00 €"
const currencyFormatter = new Intl.NumberFormat('en', {
  style: 'currency',
  currency: 'EUR',
})

currencyFormatter.format(100) 
// -> "€100.00"

It’s a great API but does have some caveats, particularly if you use english formatting on certain currencies. For example, the Swedish currency Krona. With the Swedish sv locale in place the output will be 100,00 kr, so you might expect the en output to be 100.00 kr, however it displays SEK 100.00, which seems to be a fallback.

There is an additional argument currencyDisplay which in theory will enforce the output style, but even with it set to "symbol" (which is actually the default) in this case it doesn’t matter.

Mutt Forms Vue (MFV) is an extension to Mutt Forms, a tool for building HTML forms from JSON Schema definitions, to make it compatible with VueJS. By default, Mutt Forms renders HTML forms directly to the DOM, MFV uses Vue templating system in addition to offering some other benefits - like reactive properties.

MFV was developed in-house at Bought By Many, primarily to get a more robust integration with our VueJS apps. Mutt Forms works directly with the DOM which doesn’t play nicely with Vue, it’s a bit of an anti-pattern to mix these approaches so MFV was born to solve that issue. Like Mutt Forms, it has no dependencies (apart from Vue & Mutt itself) so it’s a tiny addition to any app, and is super fast at rendering even large complicated forms. It’s available for all on a standard MIT license.

Installing

MFV is easily installed from NPM, it’s recommended to use yarn but npm works just fine too:

yarn add mutt-forms-vue

Once installed, it can be hooked into Vue like most Vue plugins by using Vue.use(). This can be done anywhere during the app initialisation:

import Vue from 'vue'
import MuttVue from 'mutt-forms-vue'

Vue.use(MuttVue)

Use with Webpack

MFV, like Mutt Forms, is written in ES6. You can use it directly but you may need to adjust your babel setup to have it transpile correctly. To avoid this, a bundled dist version is provided where the module has already been transpiled. You can include this version using the webpack alias syntax:

{
  "resolve": {
    "alias": {
      "mutt-forms$": "node_modules/mutt-forms/dist/mutt-forms.es.js",
      "mutt-forms-vue$": "node_modules/mutt-forms-vue/dist/mutt-forms-vue.es.js"
    }
  }
}

NOTE: Depending on your setup, you may need a vue alias here also, MFV internally uses Vue templates - so you will need the template compiler, not just the runtime.

Getting started

MFV will extend Vue to add the components ‘mutt-vue’, ‘mutt-widget’ & ‘mutt-watcher’, as well as extending Vue to add a hook directly to Mutt (this is available as this.$mutt inside components). The components can be used to build forms (and form fragments) directly in Vue templates. In the simplest case, you can just pass a JSON schema to a ‘mutt-vue’ component and you will get a form:

<template>
  <div>
    <mutt-vue v-bind:schema="schema" v-on:submit=”submitForm”>
  </div>
</template>

<script>
export default {
  name: 'demo',
  data() {
    return {
      schema: {
        name: {
          type: 'string'
        },
        email: {
          type: 'string'
        }
      }
    }
  }
  methods: {
    submitForm(form) {
      if(form.validate()) {
        console.log('Submission!',
                JSON.stringify(form.data(), null, 2))
      }
    }
  }
}
</script>

‘mutt-forms-vue’ also takes options, just as Mutt Form objects themselves do - in fact mutt-forms-vue components will take all of the arguments you might expect to send to a Mutt Form object.

A bit deeper

Under the hood of the mutt-vue component is simply iterating over (along with some helpful layout & functions) a set of Mutt form fields and renders each one using mutt-widget. You don’t have to do this however, if you want to create custom layouts or create form fragments you can use the mutt-widget component directly.

mutt-widget components expect a field as an argument and will render the corresponding HTML input interface for that field type. The mutt-widget component is itself polymorphic, and will inspect the field type to determine exactly how it should render. As is usual with Mutt, you can use field options to override default widgets for a given field, MFV will respect this too.

<mutt-widget v-bind:field="field"></mutt-widget>

Getting reactive

The final MFV component is called mutt-watcher. These can be used to reflect the value of a given field reactively. Internally MFV will make the field value reactive, which means should it change it will update other components reactively. ‘mutt-watcher’ exploits this, so you can create things like form summary panels or more intricate UI’s. As will mutt-widget, it requires a form field to be bound to it. It will render the field value in a text format in the format field name: <field value>, there are a few options to aid this display, but by default it will handle all of the data types Mutt understands.

It has a couple of neat uses, for example displaying the value of a hidden field that’s being updated behind the scenes elsewhere and it can even display form fields that aren’t otherwise rendered in the main form.

<mutt-watcher v-bind:field="field"></mutt-watcher>

Hopefully that covers some of the main features of MFV, there is a git repository available with all of these code samples in a working demo app. MFV is still under active development but at this stage it’s API can be considered pretty stable.

(If you end up using MFV in a project, would love to hear your experience!)

As someone who just can’t make the switch to Apple Maps permanently, it’s really no surprise to hear Google is winning this particular battle, but it’s incredible to see just how far ahead it is.

“Now, you can see 25 million new building footprints that have been added to Google Maps on desktop and mobile across major metropolitan regions in the United States, including Houston, Los Angeles, Chicago, Miami, and the San Francisco Bay Area.”

Great round up of the differences by Justin O’Beirne.

UML Sequence Diagram

UML might be 20+ years old at this stage but it’s still incredibly useful - especially when describing a Micro-service world.

Drawing the diagrams themselves, with a tool like VISO or OmniGraffle, does get old quite quickly though when changes are rapid.

I’ve started using Mermaid for generating the system diagrams from ‘code’ directly. It’s much less work as things change and is really easy to setup.

The simplest way to get started is to install the CLI version of mermaid:

yarn global add mermaid.cli

Once your up and running, you can produce diagrams by writing out a document containing the sequence:

sequenceDiagram
	participant C as Client
	participant MS1 as Microservice 1
	participant MS2 as Microservice 2

    C->>MS1: Make Request
	activate MS1
    MS1->>MS2: Internal Request
	activate MS2
	MS2-->>MS1: Data
	deactivate MS2
	MS1-->>C: Response data
	deactivate MS1

And running the build command:

mmdc -i test.mmd -o test.svg

The syntax for generating the diagrams is reasonably intuitive, but there are a couple of gotchas - most of which cause the diagram to not render. It’s worth checking the diagram reference to make sure your syntax is correct as the CLI interface doesn’t give feedback.